This guide will explain the best practices for using our highlights recording and getting the most out of you clips.
We will cover a few things in this guide:
- Highlight Settings
- Highlight Page
- Library
- Editor
- Posts and profile
- Tips & Troubleshooting
Highlight Settings
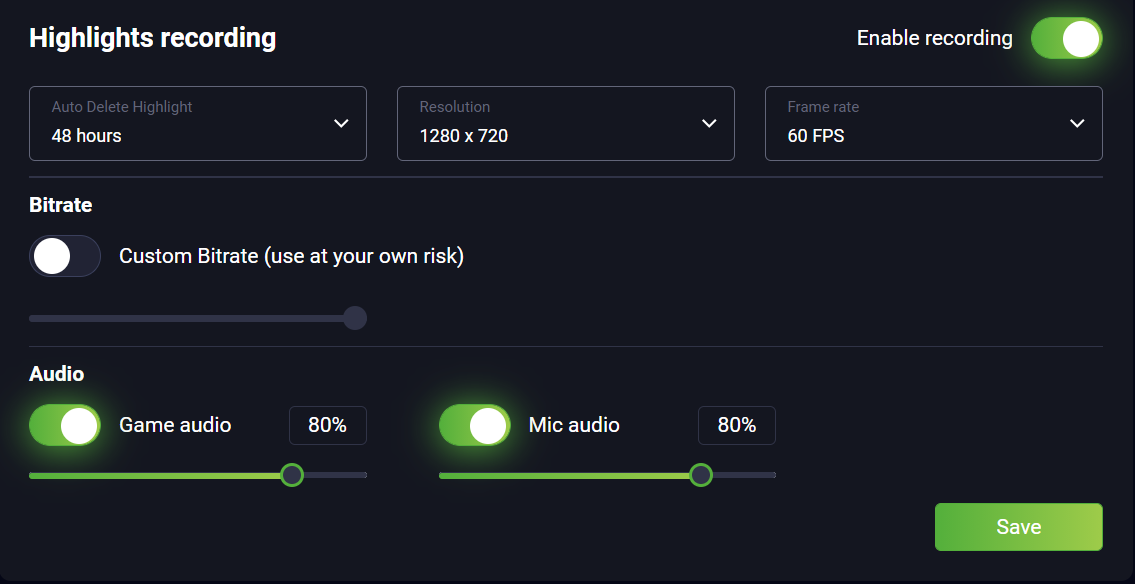
The first and most important thing is to go over the highlight settings in the settings page on the buff app. To access it you can go to settings and click on “Highlights Recording” on the top bar. The settings page allows you to control:
- “Enable Recording” – Choose if Buff will record your highlights or not. You can always come back and change this setting.
- “Auto Delete Highlight” – designates the time until a highlight is automatically deleted. Choose between 24 hours, 48 hours, 1 week, 1 month. We suggest keeping it on 48 hours allowing you enough time to edit and post your highlight without clogging up your PC.
- “Resolution” – choose the resolution in which the video will be recorded. Keep in mind that when posting a video to your profile it will automatically compress to 1280X720. You can download your video and it will keep it’s original Resolution. Options are: 680X480, 1280X720, 1920X1080.
- “Frame Rate” – Choose the FPS your highlights will be recorded in. Choose between 30 FPS and 60 FPS.
- “Bitrate” – Choose the Bitrate your video will be recorded in. WARNING – this can vastly affect your game performance. We strongly suggest you don’t touch the bitrate unless you must and leave it as default. If you do choose to set a custom bitrate you will be able to choose between 1,500 – 20,000.
- “Game Audio” – The volume in which the recording will save the game’s native audio (music and sound effects).
- “Mic Audio” – The volume in which the recording will save any sound recorded with your microphone.
The optimal settings we suggest are the following:
Highlight Page
When playing a buff supported game, you will be able to see a small red dot signifying that buff is recording your gameplay. At the end of the session when you exit the game, buff will automatically open on the highlight’s editor page. You can also access this page from the sidebar in the app.
All recording from your sessions will be organized by date recorded and by game. There are two types of recordings:
- Event Based Games – These games will automatically record special events during your game time like kills and deaths. All recording will be saved under one session. Any manual recording during the session will be saved as a highlight as well inside the session.

- Non-event based games – These games will record your entire session as one recording. You will be able to edit, post and save clips from that session. Any manual recordings during the session will be saved as pre-made highlights inside the session.
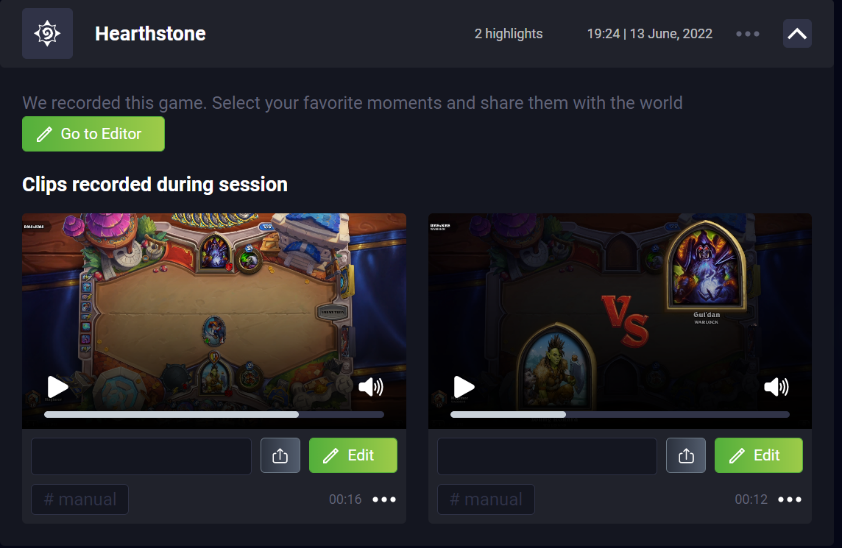
Inside the highlights page you can name your highlights directly and have many different options of what to do with your recordings:
- “Edit” – Editing will take you to the editor page and allow you to edit your highlight.
- “Upload” – Uploads your chosen highlight to your profile. An upload status signifier will appear to show the upload progress.
- “Save to library” – Saves the highlight to your library removing it from the highlights page.
- “Download” – Downloads the highlight to your chosen path allowing you to use it wherever you like.
- “Delete” – Either delete a certain highlight or delete an entire session
Library
The library is where every highlight you saved is stored. You can access it through the Library tab in the highlights page. In the library the highlights are organized by date created and not by sessions. All highlights saved in the library will not be automatically deleted unlike highlights on the highlights page. You can always edit, and upload saved highlights from your library to your profile.
Editor
The editor is where you can edit the time frame for your highlight. Inside the editor you will be able to do the following:
- View your highlight, skip to a spot by clicking on the timeline or dragging the signifier
- Choose you highlight range, between 1 second to 1 minute long, using the green bars.
- Zoom using the scrollbar next to the play button to target the perfect moment more accurately.
- Choose to play the selected are only or the entire clip while editing
- Show/hide bookmarks automatically created or manually created during recording
- Choose if to mute the video or keep it with sound
On the right side you can name your highlight, tag it with one of the tags available and choose what do with it – save to your library or upload to your profile.
Tags will be used in the future for indexing and helping your clips reach the right audience:
- Out Play – Any play that shows off your skills
- Funny – Any highlight that is funny or silly
- Fail – Any highlight that shows a failure
- General – Any highlight that doesn’t fit the other tags
Posts and Profile
Any highlight you upload will automatically be shown in your profile. Anyone visiting your profile will be able to view, like and comment on your videos. Once you have more than 6 posts your profile will automatically show your most popular posts on the top of your profile.
You can always delete posts from your profile
Tips & Troubleshooting
- Manual recording can be done in any supported game at any time by pressing “F7”. This key can be changed through the Overwolf settings.
- You can change additional recording settings in the Overwolf settings. Keep in mind, any setting that exists in BUFF overrides the setting in Overwolf.
- You will not be able to capture video using Outplayed if you enable recording on BUFF.
- You should update your graphic driver before recording highlights with BUFF. If you don’t know how to do this our support staff in Discord will be happy to help.
- If you have any trouble recording, try to run BUFF as administrator. This will allocate more resources to BUFF which will help create smoother footage.
- Capping your in-game FPS can lead to significantly better video quality without impacting your gaming experience.
- If you still have laggy clips you can try to raise your bitrate manually. Try to find the balance between game performance and video quality. You can revert to the suggested bitrate at any point using the toggle.
- If you find yourself with laggy videos and tried everything – try to check which encoder is being used through the Overwolf settings. If it’s GPU (default) try to switch to CPU. If it’s CPU, try to switch to GPU.
- Close other programs that might interfere with your recording such as Nvidia Shadowplay, AMD Relive, OBS or Microsoft’s DVR. Discord overlay and Windows Game Mode could also interfere.
- “Hardware-accelerated GPU scheduling Windows 10 new version, 2004 (build 19041)” Includes Hardware-accelerated GPU scheduling. When turned on, this setting may interfere with Overwolf’s OBS-based capture engine and cause various issues with the capturing process.
- If all else fails – Start lowering recording settings until your problem is fixed. We recommend not going under 3000 Bit rate.
- Our support agents on discord will be happy to help with any other problem you may be facing using our recording services.